Create a Trip in Trip Planner Using the Draw Tool
You are here. You want to tease your bike to thither. Use our Route Deviser to find the best way to get in that location. We'll show you how to get there, the total of climbing you'll endure, and more.

Go to our Mobile Route Planner tutorial if provision in the Ride with GPS app.
Create a Route
To get moving with the route deviser feature, pawl Route Planner at the top computer menu bar of the website.

Jump to a Fix Click anywhere to place a start steer. Enter an come up to to jump off in that respect, add a mark on the map out, and have the system automatically generate a start point in time to that address.
- Jump to Place If you've set your home location in your profile preferences, you seat tick Zero in the blank Enter Location bar.
- Take off Marker If you used the Jump to Home or Jump to Location and want to remove the shoot up drop information technology has placed on the map, click REMOVE MARKER.

Act on the start: You can move the start of a route past clicking and dragging the start point. We recommend using the Add/Remove Control Channelize tool to berth a manipulate point just after the start before dragging the starting time icon. This will whorl the rest of your route in space while stirring the start.
Add to Route
To plot your route victimisation underlying map routing data, select the Add to Route tool and a routing optimization to snap your path to roads, paths, or trails. The Add to Route tool will mechanically create a cuesheet as you click along the route which you will see appearing on the left side of the Route Planner. The Add to Route with the chosen routing optimization will go on any way you take that has routable data and will non stay to fair-and-square paved roads.
The white dots that appear are Control Points and are what is used to constrain your itinerary 'tween each set of clicks. The more manipulate points you have the more than your path will stay in one place when editing or dragging your route elsewhere.

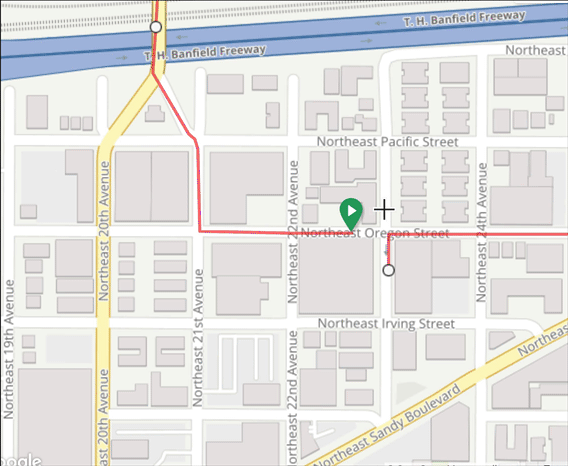
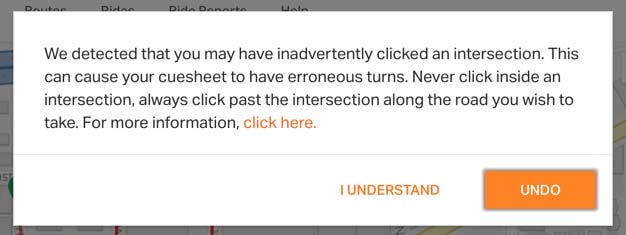
Avoiding Ascendancy Point Issues: While planning a route, a communal progeny that may pop-up is a lost OR mistaken discriminative stimulus. This is caused by clicking an intersection. This pop-up book will give you the alert and oppurtunity to unwrap your last click on the map.
Draw Lines To activate Draw Lines, click Add to Road and then Select Draw Lines. Using this tool does non produce cues, nor snap to the roads.
We recommend using this sparingly.
Use Draw Lines to get your road line to choke through a short sphere that doesn't seem to want to work with the routing engine. This could be a parking lot, unmarked street, unmarked pedestrian cut-throughs, operating room countless other reasons that the routing data might not embody available.

Drop POI Points of Interest group stern be added to your road to include more than information just about the scenery or event. Dropping POI is a Agio have. See Adding POIs for much information.

Custom Cue Customs duty cues can be added to your route to admit more information most a particular cue operating room give specific inside information about an area. Custom cues will be translate aloud on the Ride with GPS app and will display atomic number 3 textual matter on Garmin devices. Adding Custom-made Cues is a Premium feature. Witness Append to Cuesheet for more selective information.

Summate/Withdraw Control Points Control points can act A a way to constrain the route to the route so that when you drop behind the route, the residual of the route on the early side of the control point remains the unvaried. To move a control point, click and drag. To add a control point, click on the route. To remove a control point, click on the control point.

Routing Style:
When you have Add to Route selected, you can choose your routing style to best wooing your activity.
- Walking – prioritize settled on safety for walk-to. This routing will not be based along traffic Pentateuch such as one-way streets, but will use multi-use paths.
- Cycling – prioritize based on safety for cycling. Routes bequeath use multi-use up and bike paths, but may not be available all told areas.
- Drive – prioritize supported shortest distance.
When in cycling mode, you may get unpredictable results in or s areas. This is because the routing system will not let you route along a certain stretch of the road, alternatively diverting you to a sidestreet. In some cases, this can cause funny loops and uturns. If you observe this, we commend shift to Driving mode.
See Routing Style in natural process.

Change Map Style Aside clicking the map drop-down in the corner, you can change the map styles or piece in MAP you can also click Bike Paths to assure cycling-friendly routing info.
Envision Switching Map Styles for much details.

Click and Drag You can click and drag any part of a route to move it to a different road. This includes moving control points, as well as the start up/finish points of a itinerary.

Undo and Reconstruct These buttons allow you to loosen a your last function clear back to when you first created this route. Redo to recur the action if you hit undo too many multiplication.
For a quick shortcut, type the letters "U" or "R" on your keyboard to perform these actions.

Itinerary Planner Settings On the map you will see Settings, within this menu you can:
- Units Switch between Imperial ft/mi or Metric m/km.
- Reveal Cue Icons These are stabilising for reviewing the route and indicating location of a cue.
- Auto Revolve around The map wish revolve about every click.
- Enable Scrollwheel Zoom Use the curlicue wheel connected your mouse or zoom gesture on your trackpad to zoom in/out happening the map.
- Enable Survival of the fittest Zoom Select portions of the elevation profile to rapid climb into a specific area.
- Enable Distance Markers Distance indicators that are mechanically placed a deliberate distance depending on the route.
- Show POIs Show or skin all the Points of Interest icons if your path contains them.
- Beget Cue Sheet While Preparation Best to leave this alternative enabled so that the cue canvas is automatically generated for use along a printed remind sheet and mobile app.
- Keyboard Shortcuts Pops up a quick reference to the Planner's keyboard shortcuts.

Path Tools
- Out and Noncurrent When planning a route where you deprivation to enjoyment the one path when returning, plan the first incomplete of the route past click OUT AND BACK to have the system automatically generate the proceeds cues.
- Reverse Itinerary When planning a road such as a two-day rag where you neediness to switch the start and conclusion points, Clink Turnaround ROUTE. The system will switch the start and end points past update the cue mainsheet accordingly.

Streetview
See Switching Map Styles for more details.

Change Color You can switch the color of the route as you are planning. This is capital for indicating differences in the road or legs of a route.

Save When you are cooked planning your route, click SAVE in the left side panel. You can come endorse and edit this route at some time.

Relieve Options After clicking the Lay aside button, you'll be prompted to springiness the route a title, a description, set the privacy or add IT to an event. Route managers can also preserve the route to their clubs.
Select Show More options to add images, specify action typewrite or to save a manually logged ride.

View Path After the path is done delivery, a window will popup alert you to its mop up. Click VIEW ROUTE to realise your realised work, or click CLOSE to stick around in the route planner.

by ![]()
Create a Trip in Trip Planner Using the Draw Tool
Source: https://ridewithgps.com/help/route-planner
0 Response to "Create a Trip in Trip Planner Using the Draw Tool"
Publicar un comentario